Hitch pin chain retainer I made...
Chassis and Body |
This page was last edited 06/27/03 |
There are some additions to the chassis and body of the RV that you can make that will make your travel safer. It can also make your travel easier. One thing that my wife and I do each and every time we take the RV out is upon returning home we clean up the RV, top off the fluid levels, fill the fuel tanks, replace consumed food, etc. A stop on the way close to home and the fuel tanks are full. Once home - about 30 minutes and the rig is empty of dirty clothes, trash, etc. The clothes are thrown in the wash and the food stuff is either replaced, or a list is made for a trip to the store when convenient to replenish the food stuff. The clothes are replaced in the RV once they're cleaned.
This little extra effort gets things up to spec easily while you're in the 'RV mood' and while things are fresh in your mind about what you've used, etc. Ready to roll is the goal we're looking for here. With Carol and I we're ready to roll at a moments notice once these little tasks are complete. Add perishables to the kitchen and a few personal items that we want to take and we're gone!
We must assume that a multi-million dollar corporation (the designer of your RV and/or chassis) has much more ability to build the unit correctly than we do as a private individual. I always start with that premise. Additions or modifications to the unit should be done with the consultation of a professional. Many of the things you will add will be items that would have cost the manufacturer additional money that they felt they could not get out of the unit at time of sale. Our attitude as a customer may well be that we'd rather have paid the original manufacturer for the accessory installed and ready to go, than to add it later. For every person that thinks like that there is probably someone else that doesn't see the need for the accessory. That is to say that we are not an island. The manufacturer may be able to assist you in getting an accessory and may well have worked with the accessory manufacturer to build the best addition to your RV.
This page will attempt to cover some of the following. As always it is a good idea to consult a professional in areas that you are not familiar with.
Towing
Sway Control
Setup
CB Radio
Lighting
Ventilation Interior Storage
Bicycle Racks Rig Safety
Propane Tools
Parts
Communications
Chassis Insurance
Towing: Travel trailer towing, fifth wheel towing, dingy towing... are three basic types of towing we experience in the RV world. Additionally towing can of course consist of taking along your equipment trailer, motorcycle, boat or four wheeler.
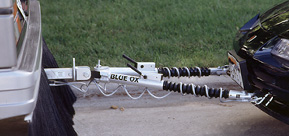
We tow a vehicle behind the motorhome to give us an economical ride when we arrive at our destination. You selection of a 'dinghy' as they are called is based on many things. The ability of the vehicle to be towed easily would come to mind as one of the first things to look at. Motorhome magazine has a dinghy section on it's web page. Look under Motorhome Tech Talk. We have selected the Jeep as a dinghy. In fact I have two Jeeps, a Grand Cherokee Limited and a CJ7 that are set up for towing behind the motorhome. There are numerous brands of tow bars available and they fall into two basic types. The older style "A" frame is a fixed unit. The "A" is locked into place and hookup is a little harder because of alignment need to get things together. The newer systems use a collapsing bar assembly that locks into the extended position when towing and collapses when being stored. When attaching the bars adjust to the distance needed to hookup while connecting and then stretch to the pulling length and lock in place when you pull ahead. Check the manufacturers page for a list of providers. I use a Blue Ox Aladdin tow system manufactured by Automatic Equipment Mfg. Co. The Aladdin, at 17 1/2 pounds is lightweight and easy to hook up. The Aventa II is the 7,500 lb steel version of this tow bar. <Aladdin> <Aventa II>
Hook up with the Aladdin is a 3 minute job. Pull the dinghy within a couple of feet or so of the motorhome. Drop the tow bar down into the pull tabs on the front of the dinghy and secure with pins. Hook up safety cables. Hook up light cable. Put dinghy in neutral on the transfer case. On the Cherokee I leave it in Park. On the CJ7 I put the transmission in neutral also since it is a stick. Turn the ignition to the first position to free up the steering wheel and you're ready to go.
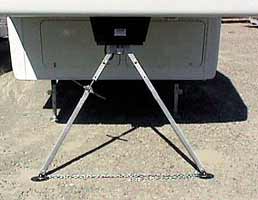
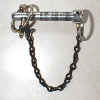
Loosing a hitch pin clip may be a problem on occasion. I always carry an extra set of hitch pins. To eliminate the loss before it happens I have added a chain to the clip which connects it to the hitch pin. They are always together now and it is a bit harder to 'loose' the whole works. See picture on right below. (click on it for larger size) It takes two of these to attach to the dinghy. My hitch pin for the main receiver is a locking type. I can then leave the Blue Ox on the motorhome when I get to a site. I always pull the power connector cord and lock it in a side compartment.
|
|
Hitch pin chain retainer I made... |
Blue Ox has furnished this checklist for towing...
Are the towbar legs locked?
Are the towbar legs pinned to the baseplate, with the clips snapped into place?
Is the towbar hooked up to the coach properly?
Are the safety cables crossed underneath the towbar and hooked?
Are the tow vehicle lights working?
Are the towed vehicle lights working?
Is the transmission of the towed vehicle in neutral?
Is the driveshaft disconnected or lube pump engaged if need be?
Is the ignition key in the proper position to unlock the steering wheel?
Blue Ox has also a nice list of things that you should and should not do and what you should check when towing a vehicle...
Do not back up when towing.
Do not use towed vehicle to carry luggage.
Is the parking brake off on both the towed and tow vehicle?
Are the mirrors adjusted properly on the tow vehicle?
Is the towbar coupler parallel with the ground? (If applicable)
Do all tires of the towed and towing vehicle have the correct tire pressure?
Is the front end of the towed vehicle aligned?
Does the towing vehicle have the proper braking capacity for your towed vehicle?
Periodically check for cracked welds and loose bolts.
Do not allow anyone to ride in a towed vehicle.
Trailer Towing - TT & 5th Wheel
|
|
|
|
|
|
|
An example is the Reese hitch system with equalizer bars and sway control shown here used for travel trailers. |
|
Towing a travel trailer requires a combination of equipment that
is suited to your needs. Basically you will need to have a vehicle that
has sufficient towing capacity for the trailer you want to pull.
Manufacturers and your local dealer will have the necessary information that you
will need here. They can offer you the best combination of engine,
transmission and cooling, along with the GVWR necessary for your
combination. I'll leave the vehicle to the experts.
The travel trailer you choose will range from a low profile pop-up to a full
size high profile, lengthy trailer. You can effectively get by with a
common ball trailer hitch, safety chains and lights when towing a small pop-up
but you'll have to get a much more effective system with the bigger trailers
being towed today.
When towing a larger trailer you'll need to add things to your tow vehicle such
as an equalizing (or weight distributing)
trailer hitch, transmission cooler, trailer wiring harness, extended
mirrors, and auxiliary braking system controller. Equalizing trailer
hitches are commonly available from you local hitch dealer and are manufactured
by such manufacturers as Draw-Tite, Reese,
and Hensley. An equalizing hitch
most often uses heavy spring bars to redistribute the weight of the trailer
tongue to the vehicle and trailer evenly. These spring bars make the
vehicle and trailer unit level. Most hitch balls I've found are located at
19 1/2 inches high. This seems to be a pretty common height and the
trailer will also be at this height. Measure yours when it is level to
give you a better idea of the appropriate height to have your hitch ball.
These hitches have mounts that are adjustable for height to match your trailer.
Another part of the equalizer (or weight distributing) hitch is a handy item
called a sway control. What this does is to add what is essentially a
friction bar assembly to the connection between the towing vehicle and the
trailer so that they won't flex at the hitch quite so quickly. This give
you a better control over the sway.
The wiring harness is also an effective part of the hitch. It provides for
connection of trailer running, stop, and backup lights along with electric brake
controls and a charging circuit for the coach battery. There are many
brands of brake controllers out there such as Tekonsha
and Hayes.
Draw-Tite, Reese,
Tap, Accupower and Jordan
use a different technology. There is some discussion on the ability of the
brake controller to respond to a panic stop situation. The Tekonsha and
Hayes seem to be a better choice here according to the manufacturers. I
have no personal experience with them in these situations.
And last but not least is the 'breakaway' safety switch. This is nothing
more than a cable or chain which is attached to the towing vehicle and pulls a
switch to the on position on a trailer. This uses the battery power of the
trailer to activate the electric brakes and hopefully control an already bad
situation of the trailer having come loose from the towing vehicle.
How should you hook up your safety chains? This example information from California may help to guide you:
CA Vehicle Code, Section 29004 (c):
"No more slack may be left in a safety chain, cable, or equivalent device than is necessary to permit
proper turning. When a drawbar is used as the towing connection, the safety chain, cable,
or equivalent device shall be connected to the towed and towing vehicle and to the drawbar so as to
prevent the drawbar from dropping to the ground if the drawbar fails."
Crossing the chains creates a cradle which, when the chains are of the correct length, will catch the drawbar and prevent it from contacting the ground.
|
|
|
An example of a typical 5th Wheel mount is the Reese shown above. |
Towing a fifth wheel has some of the same considerations as far
as matching the vehicle GVWR to the trailer being towed. You will need a
vehicle with an open bed to accept the fifth wheel connection. This is
most commonly a pickup truck... although there are specialty vehicles
manufactured to specifically address pulling a fifth wheel. A more common
example of the fifth wheel is of course the tractor-trailer rigs you see on the
road every day. The principle is the same there as in pulling your
fifth-wheel RV trailer. What is being done is that the weight of the
trailer is placed directly over the rear axle assembly of the towing vehicle and
a very strong hitch connection is established. Generally speaking this
fifth-wheel hitch is accepted as a better, solid connection for a travel
trailer. Weight distribution is built in to the system, although you will
still need to adjust the hitch and trailer to match. Adjustments are
provided in both to accomplish this. A safety 'breakaway' switch is
provided, along with a trailer wiring harness that performs the same function as
the TT assembly.
It is generally felt that the fifth-wheel provides a more stable towing
combination and is easier to maneuver. In both cases... the TT and the
fifth-wheel... be sure to take into account your overhead height when
towing. You have a vehicle which will run to as high as 12 feet perhaps
(sometimes more) and clearance is important. The new 'Lite' trailers have
a lower profile and may be a good consideration. They are available in
both TT and fifth-wheel configurations. They effectively provide the same
RVing experience but a little less headroom.
As always gas mileage is something you may want to look at also when making a purchase decision. With the price of gas going up folks will naturally want to economize when possible. There may be times that economy is of course not the prime consideration, such as the full-timer may want living space more than economy. A large fifth-wheel and the truck necessary to tow it will bring your mileage down to 5-8 mpg real quickly. A large motorhome with a diesel will get around 10 mpg while a similar gas powered vehicle will drop the mileage down in the 6-8 mpg area.
While we're talking about weight considerations remember the following weights...
Water = 8.3 lb/gal Gasoline = 5.5 lb/gal Diesel = 6.6 lb/gal Propane = 4.2 lb/galHints: While hitching your travel trailer up use an old magnetic CB antenna on the trailer hitch head to guide you to the trailer (line it up).
Sway control is always important for those RVers towing trailers or vehicles. Travel trailers are the units that require the most sway control consideration. Several sites are available to help with sway control decisions.
Hensley provides a tuning
page.
Pullrite has a unique approach in their
hitch. See their 'Principle'
page.
Here's an interesting page done by an internet user... <CLICK
HERE
Setup
Leveling - Plug In - Breaking Camp
When you arrive at the campground that you plan to visit there are several considerations. If it is a National Forest Service Campground, National Park, State Park, or other public facility you may well not have to 'check in' at a front gate. It may be a case of find the spot you want and then register at the information bulletin board or ranger station.
At a commercial campground/RV facility you will probably stop at the entrance and be assigned a campsite. Have your paperwork, including club membership/discount cards, RV tag number, personal/vehicle ID info, credit cards, and reservation forms with you for convenience. It is not unreasonable to ask to check out the campsite before you register and if there is the least bit of question I would certainly do so. Check for things like overhanging trees, pull-thru access, utility placement... and even 'the neighborhood'. Should you disconnect the toad that you're towing if you're in a motorhome? Can you disconnect it when you pull in or will you need to back in. Is the site that you are planning on staying in level or reasonably level so that you can bring your unit to a level position after parking. In this case the host will also be able to direct you how to get to the site in the best manner.
I personally refuse to park on a 'hill' because that's what's available. I believe that a serious 'hill' can be a safety issue and quite frankly I haven't used leveling blocks but once in four years and that was because of a soft base more than a leveling issue. You don't have to accept these less than desirable spots. There are too many spots that are AOK.
When you get to the site be sure to inspect the site before pulling in. Check for such things as glass, fire rings, picnic tables, utility hookups, overhanging limbs, wires and other obstructions. If you have a slideout be sure there is room for it and that you position your unit for it.
When you park the vehicle get the help of your 'partner' in parking. Make use of either hand signals or those little FRS radios are great for this. In my opinion there is no excuse in not having a set of these. I've seen the Motorola FRS radios at Wal-Mart for less than $20 each. They are a life saver.
When you stop the first thing that you will want to consider is leveling the unit. If you have a motorhome it is convenient to have one of those little round bubble levels on a normally level portion of the dash for instance. This will assist you in quickly seeing how level your are.
|
|
|
|
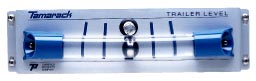
Tamarack Level |
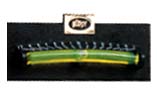
Calibrated Level, pair |
If you are pulling a trailer then it's really handy to have those oversize levels visible on the trailer to see where you are as you pull in. As you move you'll see the bubble in your rearview mirror. One thing that should be noted is that the levels above, and similar levels, have been placed on the unit when it was parked and level. When you install these levels you should have the unit set up ad you would if it were out 'camping'... that is to say have the slides out and the unit properly filled with liquids and your travel needs when you install them. The levels won't be off much if you don't but for those that are 'picky' it will be a more accurate 'calibration' of the levels.
Note: Help from your passenger or another set of eyes is great here. DON'T depend completely on these other helpers. Get out of your vehicle and survey the terrain that you are parking in. Look for such things as level, holes, rocks, tire stops and don't forget overhead. Trees, branches, power lines, and other such things can sure ruin a unit if you hit them. How far can you back up and not hit that power pole that someone decided needed to be right at the rear of your site. <grin> Also don't depend on your 'helper' to perform the leveling, locking and parking tasks. Take responsibility for your unit and park it correctly.
These days we also have a consideration for the area above the unit relative to satellite antenna placement. If you have a dish on your rig you may want to be able to 'see' the southern sky. Just another little thing to pay attention to. Years ago being 'in the trees' was neat and we still like to park in a wooded area. If the kids are along the satellite dish and such things as Cartoon Network may well become important for a quiet evening. <grin>
A lot of campgrounds have those wonderful 'pull-thru' sites available. That makes parking a whole lot easier. Give consideration to utility locations on your rig and the campsite utilities in any case. Short runs to electrical, water, and sewer connections are preferable here.
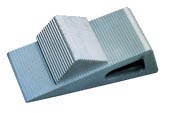
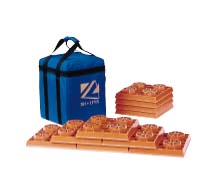
There are several ways to level the unit. You'll want to level it left-right first. Primarily blocks are placed under the wheels on the low side to bring it up to level. I don't like to have to level a unit with more than 6" in blacks. That is a personal thing... I believe that safety is a concern here. A step block is generally used so that it is easy to back up onto. An option here is the Lynx LevelersTM that I use. The Level-It Chock is also a quick option. You'll find these are much lighter than trying to carry a large enough wooden block set. I saved nearly 50 lbs in wooden blocks by going to the plastic Lynx LevelersTM that I purchased (3 sets). The cost was worth the weight saving.
|
|
|
|
"Level-It" Chock |
Lynx LevelersTM |
Find where you want the unit parked.
Pull forward.
Place leveling blocks.
Back up onto the blocks. A little guidance from your passenger here is a
help. You might make excellent use of those handy little Family
Radio System radios that are listed below.
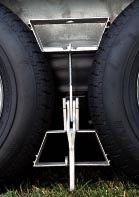
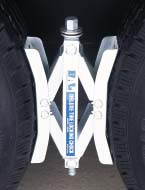
LOCK THE WHEELS! Your wheels should be locked in place with an appropriate device for your unit. That could be a wheel lock system such as below for 'tandem' wheels or a simple wheel chock for single wheels or a motorhome. In the case of a trailer you will well want to do this before you go any farther after the left-right leveling! Check the lock yourself. DO NOT depend on a third party to do so. YOU are familiar with your unit. They may not be... and that can be costly. Injuries and damage can result here. Drop your 5th wheel on a truck bed and the repairs can be costly.
|
|
|
|
Tandem Wheel Lock |
Deluxe Tire Locking Chock |
Disconnect your tow vehicle if appropriate. Be careful to unplug all electrical lines and safety cables. Unlock the hitch, stabilizer bars and other appropriate items. Pull away from the unit and give yourself space to work around the towed unit. If you are driving a motorhome you may well have a dinghy that you are towing. You may have to unhook the dinghy to park your motorhome. In pull-thru sites it is possible of course to leave it hooked up if you're only going to be there overnight and don't want to bother to unhook it. I do that often while traveling. With a motorhome you don't have to unhook the dinghy to level it in most cases.
Level the unit front to rear. Stabilize the unit by placing stabilizing jacks under the four corners or using the built in jacks that are on some units. When you've got the unit jacks extended fully then you are stretching the safety limits here. There are simply too many places to park your unit safely rather than jack it up on the side of a hill and try to keep it there. We've all see jacks that had several blocks of wood under them to make them 'reach'. I don't even like to walk around some of these units because I can just seem them coming loose. <grin>
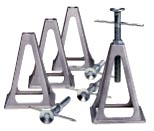
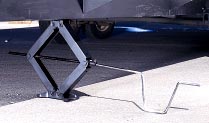
There are several forms of jacks available for your unit. The simplest of jacks which many trailer owners use is the Aluminum Stacker Jack below. Scissor Jacks are often attached permanently to the trailer and then just require you to attach a handle and screw them down. There are many variances here on what is available right up to the computerized HWH hydraulic leveling jacks on motorhomes. It is not recommended that you lift the unit so far as to pull the wheels off of the ground with these hydraulic jacks, or any other jacks for that matter. The wheels/tires are a major part of the stabilizing of the vehicle. Be sure that the hydraulic jacks have a stable base to push down into. There may be a need to put a block under the jack (I use a Lynx LevelerTM block to do this if needed). Consult with your RV sales/service staff to get the appropriate set of jacks for your unit. They will install and service attached jacks and show you how to use them.
Trailers have a center hitch jack that is either crank or electric. That jack is generally only used to lift the trailer off of the hitch ball. Independent jacks should be placed under each corner of the unit and the hitch jack should not be used for leveling purposes. Note the 5th wheel internal jacks that come on all 5th wheels. These are either electrically controlled or they are manually cranked down. You should put these in place at the time you are leveling your 5th wheel. These are used for leveling.
|
|
|
|
Aluminum Stacker Jacks |
Scissor Jacks Stabilizing System |
|
|
|
|
BAL King Pin Stabilizer Jack |
BALÛ Telescoping Stabilizers |
After you've parked, leveled, disconnected, and stabilized the unit you're ready to plug in shore power, water, and sewer connections as appropriate. Connections for these things are covered in other places here on Roy's RVing pages. Electrical safety, sealed sewer connections, and non-drip water connections are both a courtesy and a necessity. Please take care of these things properly.
Camp breakdown is pretty much the reverse of the above. After dumping your holding tanks if you have campsite sewer connection, unhook shore service water, electricity, and sewer. Be sure to crank in your roof antennas, awnings, vents and other such things. Close windows, stove vents and line storage. This is a good place to have a checklist. Hook up electric, safety lines, stabilizer bars, hitch locks, unlock your wheels and pull off of any leveling blocks and be sure to put them away for the next need you have. Clean up your campsite area taking such things as trash sacks to the dumpster that is usually available. A few campsites instruct you to leave trash bags at the site and they'll be picked up. Your camp host will guide you here. Drive to the dump station and empty your holding tanks if appropriate.
Your ready to go!
Notes: Fifth wheels... When you're in the process of hooking up your fifth wheel go ahead and hook up the umbilical cord. You'll have trailer brakes then and can 'hold' the unit in place as you back under it and lock it up. It's also good to have a wheel chock locking up the wheels so you don't have anything get loose that you didn't plan on.
TT... Don't be too quick to remove the wheel chocks. Make sure you're hooked up completely for safety sake.
Notes: If you have the scissors jacks seen above you can make a driver for the scissors jacks and put it in your cordless electric drill and screw the jacks up and down much faster and easier.
Steps: Most steps I've seen on fifth wheels are the two/three level manual fold-out steps. In fact, I'll go so far as to say I've never seen the electric steps on a fifth wheel although they must be out there. Motorhomes, on the other hand, usually have the electric Kwikee steps that open when you open the door so that entry/exit is possible immediately. That is of course a safety feature for the 'vehicle'.
A little note here is the wiring for these steps if you should find yourself with a problem...
red - goes to chassis battery - always hot;
yellow - ignition over-ride goes to ignition switch - hot when
ignition on, and will always retract steps when power is applied to
this wire;
white - supplies power from chassis battery through the power switch
when the switch is closed.
brown - goes to ground via door switch.
Hope this helps you service them if there is a problem. Be sure to lubricate the step mechanism on a regular basis with the Kwikee spray lube that is available at your RV supplier.
CB Radio
CB radios are not the Vogue that they were in the 70's but they are still a
valuable tool. The price has come down and you can get a really nice unit with
antenna, ready to go, for less than $200. I chose to purchase a Cobra 29 LTD which
also had weather information in it. When there is a special weather alert the unit
comes on and alerts you to the weather problem with the emergency weather tones that the
National Weather Service puts out. CB units are easy to install. There are a
few CB professionals still operating out there. If you have trouble finding one you
might try asking the local truck stop who does work for the big rigs. All current
radios have 40 CB channels at a minimum. Channel 19 is the 'trucker' channel and is
used frequently while on the road to hear travel/road conditions ahead. A good
listener is going to get along just fine here. Listen for information relative to
the direction of travel you're taking, or ask for it if there is none being put out.
When joining a club activity you will want to note the CB channel that the club uses to
communicate while traveling, or during activities. Again, it is a great
communication tool. Many campgrounds have a CB setup also for information and
communication. Get the channel they are on from them when you check in. You
can use it to report what site you've chosen, any discrepancies in the campground, etc.
Channel 9 is the universal emergency channel. It is common for sites to monitor
channel 9 for emergency traffic and it is hoped that you can get emergency help on this
channel. The key of course is that someone is out there on the other end listening
for such traffic. That is not always the case but it is an excellent starting point
to get help.
For an antenna I have installed a Firestik® No-Ground Plane 3-Way Mount Kit, Model FG2-648 which is a 2 ft. high antenna designed for use on fiberglass motorhomes. The higher the better with the antenna. I have the SWR set on the antenna to perfection. I am still not satisfied with the reception. CBs do have their limitations. Here is a nice article about CBs and RVs... <CLICK HERE>
Lighting
Basic lighting on the unit is fine for normal driving. There are several
times that you will want more lighting. Beware getting too much light and too little
battery. Some lights may well need to be switched electrically with the standard
lights to avoid excessive drain on the battery.
Docking lights: Docking lights are those approximately 3" lights that you see mounted in at an angle on the front or rear sides of an RV. They are switched separately and act as a light to assist you in parking, turning, etc. For about $100 plus installation you can have docking lights mounted on the left and right side of your motorhome. Double that and you can have them on both ends of the vehicle. I have added a set of docking lights to my motorhome. I added them using a relay off of the normal backup lights. When I put it in reverse the docking lights then come on automatically. The relay keeps the power requirements low for the backup light circuit and runs the docking lights directly off of the battery.
Driving lights: Lights mounted on the front of the vehicle that are essentially a fog light in nature or a high output long distance view type light. Most of these types of lights are acceptable. Check with your vehicle laws on aiming such lights, etc.
Flashing Running Lights: Ever see those flashing running lights on a group of camper's in a park for instance? How did they do that? For a trailer it is as simple as providing a 12 volt power source to the running light portion of your trailer connector with a heavy duty flasher wired in between the power source and the running lights. Don't run down your batteries doing this is a given. For a 7 way trailer plug, the easiest way is to connect a heavy duty 12 volt two-pin flasher between pins 3 (running lights) and 4 (battery charging). Pins 3 and 4 are the pins on each side of the locater extrusion on the plug. If you want them on steady then use a piece of 12 gauge wire to jump them. For a different plug you'll obviously have to make up a plug arrangement to do this. I would personally buy a vehicle side plug and use it to put a flasher and wiring into the circuit. You can plug and unplug it then to get it to work. Use this same arrangement as a warning device at night if broken down.
For a motorhome you'll be doing some wiring under the dash or similar location to get to the running lights circuit.
I've found it is always nice to have a work light to show up the area around the hitch. It makes hookup/disconnection a lot safer at night.
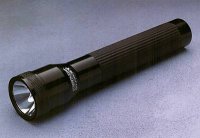
Under lights is one very important one for me: Flashlight. Here I make one choice and that is the StreamlightÛ Stinger™ rechargeable flashlight. This flashlight has 15,000 candlepower and in my opinion is the only way to go. It can give you up to 1 hour on a charge. Comes with a recharge unit (12 volt or 110 volt). It is compact at only 7.4 inches long and weighs only 10 ounces with the machined aluminum housing. With the non-conductive nylon polymer the weight drops to 8.7 ounces. |
|
The only way I can describe what 15,000 candlepower looks like is to give you an example. I can walk up to a group of folks with flashlights on... say a half dozen or so 'normal' flashlights and turn on this one and the rest of them might as well turn off their lights 'cause they're wasting their time... and light. They aren't cheap at about $90 per unit (which includes charger) but you'll not find a better light. I have one for myself and one for my wife. My biggest problem is keeping my granddaughter from taking it and running it down! StreamlightÛ has other quality units available that are also rechargeable. The SycloneÛ is a fine example, along with their SL-20X™ with up to 30,000 candlepower pre-focused and SL-35X™ with up to 40,000 candlepower pre-focused. As a police officer I used such lights with great results.
The reason that I mention the flashlight primarily is because of the obvious portable nature of the unit. The flashlight could be placed under other categories such as camp necessities, tools, etc. It is certainly a handy tool to assist you in seeing when you need to. The quality of the StreamlightÛ is so far above other lights that I have dealt with as a professional, that my personal opinion is that there is no better choice!
There are options and the Pelican Products flashlights are one of them. The provide excellent rechargeable flashlights.
|
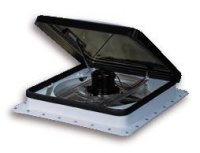
Automatic Deluxe Fan-Tastic Ceiling Fan Vent. Preset the three-speed switch and the polycarbonate dome cover opens automatically to cool off your RV. Fan will shut off when pre-selected temperature is reached, but dome stays open for ventilation. Built-in rain sensor automatically closes dome cover during heavy downpours and allows it to reopen when rain stops. Thermostat has rain sensor override. Draws max. 3 amps. Ship Wt. 12.62 lbs. |
Automatic Deluxe Fan-Tastic Ceiling Fan Vent |
We purchased one of these Fan-Tastic Fans primarily due to the large fan
that it contains. It very effectively moves the air in the motorhome. There
are many times that I would like to enjoy the great 'outdoors' without turning on an A/C
unit. This one also will monitor the heat in the unit and come on when needed while
you're gone. If it rains, it shuts down to prevent the rain coming in.
Note: One of those little hints... if you want the Fan-Tastic Fan to not
open so far then you simply put pressure on the handle that is used for manual
opening while the automatic opening is occurring. The pressure applied at
the appropriate time will stop the unit from opening at that point since it
'senses' that the unit is fully opened. This will not damage the fan but
does work effectively.
Lighten and brighten your RV's interior without restricting air flow or interfering with roof vent use. Allows constant air flow through your RV to stop heat build-up. Musty air and odors escape while rain stays out. Pre-drilled mounting holes provide quick and easy installation onto any standard 14" roof vent opening. (Aluminum hardware included). USA. Ship Wt. 3.00 lbs. |
|
Translucent (White) Vent Cap Cover |
The above vent cover allows you to use your vent while in motion, during rain storms, etc. They are becoming very popular and are very cost effective. Cost is around $20 plus installation. When it is raining you'll really appreciate that you decided to purchase such a vent cover.
As we travel it is convenient to have all of the necessary items at hand while still maintaining some semblance of order in our packing. We've got various locations set up for food and clothing. We also have accessories that we will be using immediately when we get where we're going. They need to be handy but conveniently 'out of the way' as we travel. Then there are other things that simply won't fit in under storage areas.
We started by relegating like items in the same areas making it easier to find things. We have also purchased plastic containers that will fit into the overhead storage areas nicely. We use four of them to contain the foodstuffs that we'll need. See Kitchen Storage for more information.
Under the couches we use the same philosophy of having a plastic container for storage. We generally have bedding and extra soda pop under our couches.
Storage for items related to cell phones, Family Radio System, rechargeable flashlights, and other charging systems are kept together. You'll need these often as it is necessary to keep your batteries up and ready for use.
One place that I find is a great waste of space is the shower. Most everywhere we go there are showers furnished. The one in the rig is seldom is used, but is an excellent place to store stuff while traveling. I've found that a "TwistTight No Slip Shower Rod" is really great for two things. I put our lawn chairs in the shower area and put the shower rod across the door so that they would not fall over (padded with a towel). The shower rod holds things in nicely... similar to the small bars that are available to put in your refrigerator to hold items on the shelf. I bought two shower rods and they are also great for then using when you're parked for clothes rods. They give you an excellent place to hang towels, shirts, etc. to dry. The vent fan in the shower pulls the air right across the clothing to dry it quickly. These shower rods twist in place to hold themselves. The chairs we store in the shower are of course put into use. Local shower facilities are almost always available. If not we can use the motorhome shower.
If you've seen those refrigerator safety bars you might not be able to find them locally. Simply go to Wal-mart and buy a 7/16" diameter spring curtain rod 18-28" long and you're set. They are available at other stores that sell curtain rods also of course. They are inexpensive and do the same job, if not being a duplicate of the refrigerator rods. To adjust these rods you simply twist them to screw out the length to the length that you need plus a half inch or so and then compress them and put them in place. These are also a good one for retaining stuff in an overhead cabinet.
Various racks are available at you local bike dealer to fit your needs. Very popular are the 2" receiver models that fit into your hitch receiver and hold 1-4 bikes. You can use the same principle of a hitch on the car for putting a hitch on the fifth wheel trailer and mounting the bike rack on the rear of the fifth wheel trailer. Unless you have particularly heavy bikes this should not create a problem. You should be aware of the clearance so that when you go into a low ground clearance area you'll not run into problems. I've seen bikes mounted on the roof ladder. I don't like that because of the weight involved. It seems to work... but for how long? Various bike rack manufacturers include but are not limited to Swagman (I bought this one), Thule (roof mount), Alpaca, Atoc (car top), Badger (2" receiver mounts), Yakima, Hitch-It, Softride.
While traveling it is hoped that you'll never have a breakdown to deal with. If and when you do, you will be well advised to have a few simple things in the unit for safety. All of these things are available from your RV dealer and should be installed if you don't have them already. I have started a fire safety page and you'll find it here. <CLICK HERE>. I'll try to give you a good basic information resource to assist you in your knowledge of keeping your rig safe.
Fire Extinguisher - Most RVs these days come with fire extinguishers in them. Get with your local professional - a fireman - and find out just exactly what you should have in the RV for maximum safety. Remember that the fire extinguisher hopefully will never have to be used to put out a fire in your RV, but you're camping and lighting a fire right outside the unit many times. That fire extinguisher should also be readily accessible to someone outside that may be in trouble with the camp fire. The fire extinguisher that is furnished with the unit may also be a minimum level of equipment. Here's one area that I believe more is better. Opt for a better fire extinguisher. It's cheap insurance. At around $20-$30 for a nice size extinguisher it's hard to ignore this inexpensive safety item. 99% of all fires are an 'A' type fire and the fire extinguishers in RVs are usually 10 BC extinguishers. These are a federally required minimum and do not address your actual needs in my opinion.
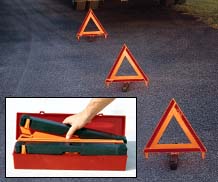
Warning Devices - It's a good idea to buy a set of the triangular warning devices that you see used on the highways by truckers to warn other drivers of a disabled vehicle. These are available from truck supply, auto supply, and Camping World, among others. |
Warning Triangle Set with Case |
Protect yourself during roadside emergencies with Warning Triangles. By day, a flame-orange fluorescence; at night a super-powerful reflector. Set of 3 triangles that unfold to 15 1/2"H x 17 3/4"W. Heavy plastic case. |
|
Smoke Detector - Again, most of the modern RVs are furnished with a smoke detector. This is another inexpensive item that should be retrofitted to an older unit. It's aggravating when it goes off if you burn something on the stove. It's even more aggravating to lose a life because you didn't want to be aggravated with the cooking thing. Get a smoke detector, keep a battery in it, and test it regularly. $25 or so should get you fixed up here.
We have purchased a FireX Smoke Alarm (item 04651, Model C). It has a 9V Lithium DC Battery
that should last about 10 years. It has a 'False Alarm Control' to silence
nuisance alarms. Push the button and you've got 15 minutes of peace and
quiet while you cook. It automatically resets and lets you know that it
has reset with a chirp, chirp. These are available from Mac
McCoy and other sources I'm sure.

Carbon Monoxide Detector - A detector that meets Recreational Vehicle and Residential U.L. Standard 2034 is appropriate. The most common producer of carbon monoxide is of course the exhaust system although in an RV there are other sources of this gas. One of life's necessities. This should cost around $100 to have one installed, if you didn't have one in the unit.
Propane Detector - This detector will help detect an LP gas leak. In an RV I consider it a necessity also. This unit is also around a $100 to have one installed if your unit didn't come with one.
Fluid Levels - Check all fluid levels in the RV on a regular basis. Your motorhome has the same requirements that your automobile does and requires the proper gas, oil, antifreeze, transmission, and brake fluid levels. Check your owners manual for proper levels and proper replacement fluids.
Safety Products - While at a recent seminar I learned of some of the safety considerations that we need to address in an RV. Mac and Sheri McCoy have a safety business. I was very impressed with Mac's presentation and the products they sell are things that all RVers should have knowledge of. They can be contacted for more information at firesafemei@juno.com. They are working on getting a web page on line. Currently their web presence is covered in their RV Alliance page listed above.
Refrigerator Vent - Check the refrigerator vent and make sure it is clean/free-flowing. Sometimes there can be wasp nests, birds, and other such in the vent causing a problem.
Tires - I will not attempt to do the tire manufacturers job here. Let is suffice to say that you should have tires that are the appropriate size for your vehicle, and they should have the correct air pressure in them for the vehicle you own and the tires that are on it. All tires must be in a good state of repair or you are courting disaster! It is also my suggestion that you have a good road service in case of flats. The lug nut torque on a commercial size tire is 450 lbs and is not what the average individual will either have the strength to remove or the tools to do so. A road service will have those tools and air impact tools to remove and replace the wheels/tires. Many new vehicles now no longer even come with a spare tire. I particularly like the Smartire System, Inc. which keeps the driver advised of the current tire pressure and temperature on each tire on the vehicle and on the towed vehicles. It is not cheap but it can save you a fortune if you have a problem.
Propane safety is always a consideration in the RVing we do. Tanks should be filled properly and kept in a good state of repair. Systems should be checked regularly for leaks and proper connections. It is advised by many to turn off propane while traveling to minimize the impact of a collision. It should also be noted that as of April 1, 2002 tanks that are not equipped with an OPD are no longer legal to refill. These tanks must be replaced. Here is a pamphlet that the National Propane Gas Association puts out about the new Overfill Prevention Device (OPD). It can be found on their web pages or <CLICK HERE>. I have been advised by the local Ferrelgas folks that tanks that have the old style valves can be retro-fitted at a cost of $20 or less per tank. The tank would of course have to be in serviceable condition and withstand testing.
You should plan to maintain a basic selection of tools for your RV so that those little
repairs can be made that might come up. Tightening a loose screw or a loose nut now
may well avoid a disaster later. Tools that I keep around:
Screwdrivers - No. 1 Phillips, No. 2 Phillips, small and medium flat blade.
Knife - Here a utility knife is a handy tool. It uses a replaceable razor
blade arrangement.
Wrenches - Various basic size wrenches are nice. I suggest a set with box end
on one end and closed end on the other. A couple of Crescent wrenches are also
desirable.
Sockets - A socket set with both metric and English sockets with a 3/8" and a
1/4" drive are a nice addition.
Miscellaneous 1/8" Drive Tools - I found a nice inexpensive Black & Decker
variety pack with 1/8" drive sockets, screwdrivers, square drivers, drill bits,
countersink, etc. I nice plastic case for it all is a good RV item.
Nut drivers - The kit listed above has sufficient equipment in it to work
as a nut driver. (9/32" to 1/2")
Other drivers - Square drive 'screwdrivers' are usually a necessity with an RV.
You'll see this type of fastener in your woodwork, metal attachments, etc.
They are used much as a common Phillips head screw would be used.
Trouble light - Be sure and throw in a 'trouble light'. New models have
fluorescent light.
Extension cord - It's always nice to have a shop grade 14/3 extension cord handy.
Pliers - I find the Craftsman Robogrip pliers to be invaluable.
Since they are pliers but also adjustable, they come in quite handy. I have two
sizes of them.
Vice Grip Pliers - These are invaluable holding tools. Good
for loosening a rusty connection.
Hammer - Since I don't plan on building anything, but more often repairing
something, I purchased a 4 lb hammer. This is one you can use to bend something back
if it gets bent, or pound in a tent stake if you need to.
Electrical repair kit - Diagonal pliers, crimper, and a selection of connectors and
terminals and perhaps a roll of 12 gauge wire for repairs.
Circuit Tester - You'll need this to check your 12 volt connections and
wiring. It will test the continuity.
Flashlight - You'll need a good flashlight for working in blackout
conditions. I've covered flashlights in other places on this site.
Hacksaw - For cutting metal tubing or wood.
Cordless drill - These units are light, inexpensive, and handy for those little
'fixups' that you run into.
Electric air pump - The pump I have is an old Coleman pump that I picked up 20
years ago. It still is in like new condition and will pump up a tire or fill an air
mattress just fine.
Waterless hand cream - A real cleanup necessity. You can get a small can that
is more than sufficient for those few times that you need it.
Shop rags - Sam's, Wal-mart, Kmart, or perhaps your local auto parts store has a
bag of those old red shop rags that you're used to seeing. They are inexpensive and
really handy when you get to checking the oil, or working around your RV.
Brown Jersey gloves - Cheap gloves to help keep you cleaned up and protect your
hands while working on the RV.
Oil/Antifreeze funnel - Plan for such additions as oil and antifreeze to your
vehicle when they get low. A good funnel may be needed with a hose extension on it
to reach.
Hand fluid pump - On my diesel it was impossible to 'pour' oil into the motor
input. I found a fluid pump from Parts America
which has a hose on it and is made to screw into a one gallon oil or antifreeze container.
I bought one for oil and one for antifreeze. I consider this an absolute
necessity.
Tire Gage - You'll need one to check your tires and it should read up to
100 lbs.
Bottle of soapy water - This will assist you in checking gas leaks.
You can make up one as needed from the kitchen dishwaying fluid.
Tape - Roll of electrician's tape and a roll of the infamous duct
tape can always be handy. Masking tape can always be handy.
Fuses - All shapes and sizes that your unit uses. Check dash fuse
block and converter for sizes to have on hand. Don't forget those in line
fuses that I've mentioned in other places on this site.
Light Bulbs - An assortment of light bulbs that your unit will need is
always a convenient thing to have around.
Spare parts are always a necessity. A variety of screws, nuts, bolts, cotter keys, lightbulbs, electrical connectors, and other such necessities are really handy to have on hand.
Storage for those parts is as simple as buying a Plano Adjustable Case. I have purchased the 3620 which seems to be the right size for storing such things as screw, lightbulbs, nuts and bolts. There are numerous sizes available. It appears to be a lot easier to organize from the start rather than trying to fumble through parts for the one that you need.
Pagers, telephones and the new two-way 'family' radios are important tools.
Local/Regional pagers come in several flavors. The most obvious is the basic pager unit. Your yellow pages probably has an overpowering list of available providers. Experience has proven that there are really only a very few providers of the air signal. Most of the rest of the folks are simply equipment providers and air signal service resellers. Opt for a national provider and you may well find some pleasant services. I use PageNet exclusively and one immediate benefit is the 'footprint' of the pager coverage area. The 'local' pager that I have actually receives signal in an area virtually the size of western Missouri and eastern Kansas, covering a lot of the areas that we camp 'locally'. Disadvantage... if you're out of range you'll miss a page.
National coverage is provided by such folks as PageNet to cover anywhere that you may be in and about their national coverage area. What that means is that when a signal is sent to your pager number, it is broadcast in any area that there happens to be a PageNet national tower. You're not going to get a page in an area where no such tower exists, for instance in the middle of Wyoming. These pager companies provide a service for a fee (PageNet is $1/month) that keeps a record of your pages and you can call an '800' number and retrieve pages you may have missed while out of service range. Advantage... no lost pages.
Latest on the scene is the 'two-way' pager. I have one of these units. Motorola produces the unit and it is top quality. This unit has two-way capability when within range of a two-way tower. If the unit is not receiving two-way pages it then stores the pages on the system and when the pager connects next time it 'catches up' on the pages. It too has an '800' number to check on pages when out of the service area. This pager also provides for voice mail messages, along with paging to tell you that there is a voice mail. This is a neat pager if you're within range in a big city. It allows you to send brief email messages and page back to someone. It also provides numerical and alpha return capabilities. Smaller towns and remote areas you'll be out of touch except for the '800' number. Advantage as above... no lost pages.
Telephones come in several flavors also. Since the popularity of cellular phones has skyrocketed it is unlikely that most folks haven't hear of or seen them around. There are four or five major brands these days. I personally keep a Cingular phone in the RV at all times since it can get service just about anywhere.
Here in the Greater Kansas City Area I have acquired service from Nextel also. The Nextel has become the phone of choice for daily use for one simple reason... the radio feature. With Nextel the phone is also a two-way radio, much as a ham radio, or police radio would be. The two-way radio doesn't cost anything extra and airtime is free for it. The radio is of course limited in use to contacting those that also have a Nextel phone. I've purchased 10 of the units and each of my employees have one. The footprint for this phone is phenomenal! My wife has gone east to within 30 miles of Mt. Vernon, Illinois and been able to contact me back in Kansas City over the no charge radio system. A trip to Wichita is like still being in Kansas City for radio connections. Nextel has voice mail and paging services built into also. It is quite a phone offering.
For the record, I've tried the Sprint PCS system since Sprint is home based in KC and it seemed like the thing to do. I gave it a year and wished I had purchased a couple of tin cans and a string. I'd have had better service. I finally gave up on the PCS and went to Nextel.
These new digital phones all say that they will have modem capabilities but I have not seen a completed system yet that provides this state-of-the-art modem capability. When I find one I'll list it here.
All of the cellular phones listed above come in a portable version which I use although they only have .6 watts of power to conserve battery power. The full power version has 3 watts of power. Most of the handheld units have car adapter systems that either charge the unit or allow the unit to be boosted to the full 3 watts of available power. I've found the handheld to be sufficient in most cases. I do not use a car booster. I do have a car adapter cord for charging the phone and using it to reduce drain on the rechargeable battery.
Roaming is a situation where the phone you are using leaves its' 'home' area and the company providing the cellular service that you are then forced to use while outside your normal area will charge you a roaming fee. Depending on your usage this can get expensive. I've also found that it only occurs on phones that you can use pretty much everywhere. The digital services, almost exclusively, offer no roaming charges associated with their use. That's great if you have any coverage. Not a good deal if there is no service. If you travel only to major cities where they have such service then you're good to go! I prefer the ability to get connected vs. the ability to get no roaming charges. Since I have both Nextel and SW Bell I'm fixed up in either case. Typically roaming charges involve a 'roaming fee' daily and the per-minute charges are much greater than if you are a local caller. One might also note that within the next five years it is predicted that the analog phones will go away. There are many logistical reasons to take care of before this elimination. Most major companies now offer plans with no roaming fees and no long distance.
Note: Save that old phone for emergencies. All phone companies must accept calls from a cellular phone to 911. The FCC rules state that all services are required to handle 911 calls. Phones are assumed to be registered to 'the other company' by the receiving company in this case and the emergency will be handled, even though the phone is not subscribed to anyone.
My choice for one reason... it is the smallest and every ounce counts when you're carrying equipment. |
Family Radios are a new generation of radios that operate under the federal government family radio system guidelines. These are tremendously handy little radios that allow you communication between two people. Examples include talk between a hiker and the RV, between the parked RV and your dinghy vehicle, between the kids out playing and the RV. The list goes on and on... these things are great! |
Motorola has entry level units as well as full featured units. |
|
This is the new Cobra 310WX which also includes weather information. I like this feature. Cobra makes many models to fit your needs. |
Note: I've just learned Note: I've just learned from a company representative that Cherokee will not be making FRS radios any longer. Other brands such as the Motorola and Cobra will take up the slack. |
FRS was created specifically for the use of families and small groups. This service allows the group to use a small, easy to use, and relatively inexpensive two-way radio for the purposes of voice communication between members of the group. These radios, in many cases, give the group a choice of channels to use, to help avoid interference from other groups, as well as other features. The cost from $50 to $200 per radio. You must have a second radio to talk to to make use of them. You'll need to buy two of them to make use of them. There is no license, user fees, or subscription to pay for. Simply buy them, put in batteries, and use them. These are not cellular phones and do not compare to cellular phones. They are simply two-way radios with multi-channel capabilities and 'privacy codes' in many cases. The privacy codes are another method manufacturers use to break up a channel so more variances exist. There is no guarantee that different brands will work together. They have a minimum effective range of .75 mile and a maximum usually advertised at 2 miles.
A new group of radios similar to the FRS radios has come on the market and allow for up to 5 mile range but require a license to be applied for.
I really like the Cherokee brand of radio. It is smaller and has some pretty standard locations for the switches on it, similar to its' bigger cousins. The Motorola brand is certainly nice but has the button in the center of the speaker. Not my choice and it is a little bigger format. Cobra also makes a nice unit.
Brakes - A PacBrakeÛ
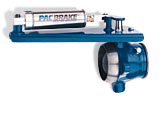 is a nice addition to the motorhome if your motorhome
doesn't have one from the factory. A PacBrake is an engine brake or an exhaust brake
that is quite expensive. An exhaust brake uses the compression of the engine to slow
the motor vehicle. The PacBrake interfaces with the ECM (electronic control module)
to properly control the engine speed.
is a nice addition to the motorhome if your motorhome
doesn't have one from the factory. A PacBrake is an engine brake or an exhaust brake
that is quite expensive. An exhaust brake uses the compression of the engine to slow
the motor vehicle. The PacBrake interfaces with the ECM (electronic control module)
to properly control the engine speed.
Wiring - The vehicle you tow, be it a trailer or a dinghy should probably have the following default trailer plug wiring. There will be wires for left and right turn, stop, and running lights. There are also additional wire locations for battery charging and electric brakes as appropriate. <CLICK HERE> for the diagram of a 7 pin plug and a 7 pin to four pin plug.
Dinghy braking is a subject that is now beginning to be covered with more interest as the size of vehicles being towed and the laws change.
Blue Ox has a nice system called AutoStop out that looks interesting. I personally don't use a dinghy braking system but have given some consideration to this new unit.
Insurance for your rig is a very important consideration. There are many sources for your insurance needs, including but not limited to your local 'independent insurance agent', 'brand name' insurance companies, and such sources as your RV club. Virtually all clubs seem to have a connection to an insurance carrier to provide you RV coverage. It would appear that through these sources there are seven insurance companies that particularly address the needs of the full-timer RVer. They are listed below. I'll attempt to gather info on what they offer that your 'home brew' insurance would not offer.
American Modern (not in all states)
Royal (motorhomes only)
Progressive
Foremost
National Interstate
National General
National Alliance
Plumbing - Sewer
hookup, water hookup
Electrical - Getting power to the
right places in the right quantities
Kitchen - When you fix something to
eat it's just like at home with the same needs
Outside the RV - What you'll need to
enjoy the great out of doors while RVing
Entertainment - Electronic or old
fashioned...
ˋ 1998-2002 Roy Timberman
All trademarks are property of their respective owners.
www.timberman.com